Glucometer Accuracy Factors: What Affects Results
Glucometer accuracy factors explained: FDA standards, common errors, and practical tips to get reliable blood sugar readings at home.

In this article(14)
If your glucometer gives you a different number every time you test, you are not imagining things. Glucometer accuracy factors range from how you store your test strips to the temperature of the room where you test, and they all stack up in ways that change the number on the screen. Understanding these variables helps you trust the readings that guide insulin doses, food choices, and the decision to treat a low.
A reading that is off by 15 percent in either direction sounds small until you realize that a meter showing 90 mg/dL might really be 76 or 104. That spread matters when you are deciding whether to eat glucose tabs or wait. Knowing what shapes those swings is the first step to getting steady, dependable numbers.
How Accurate Are Blood Glucose Meters
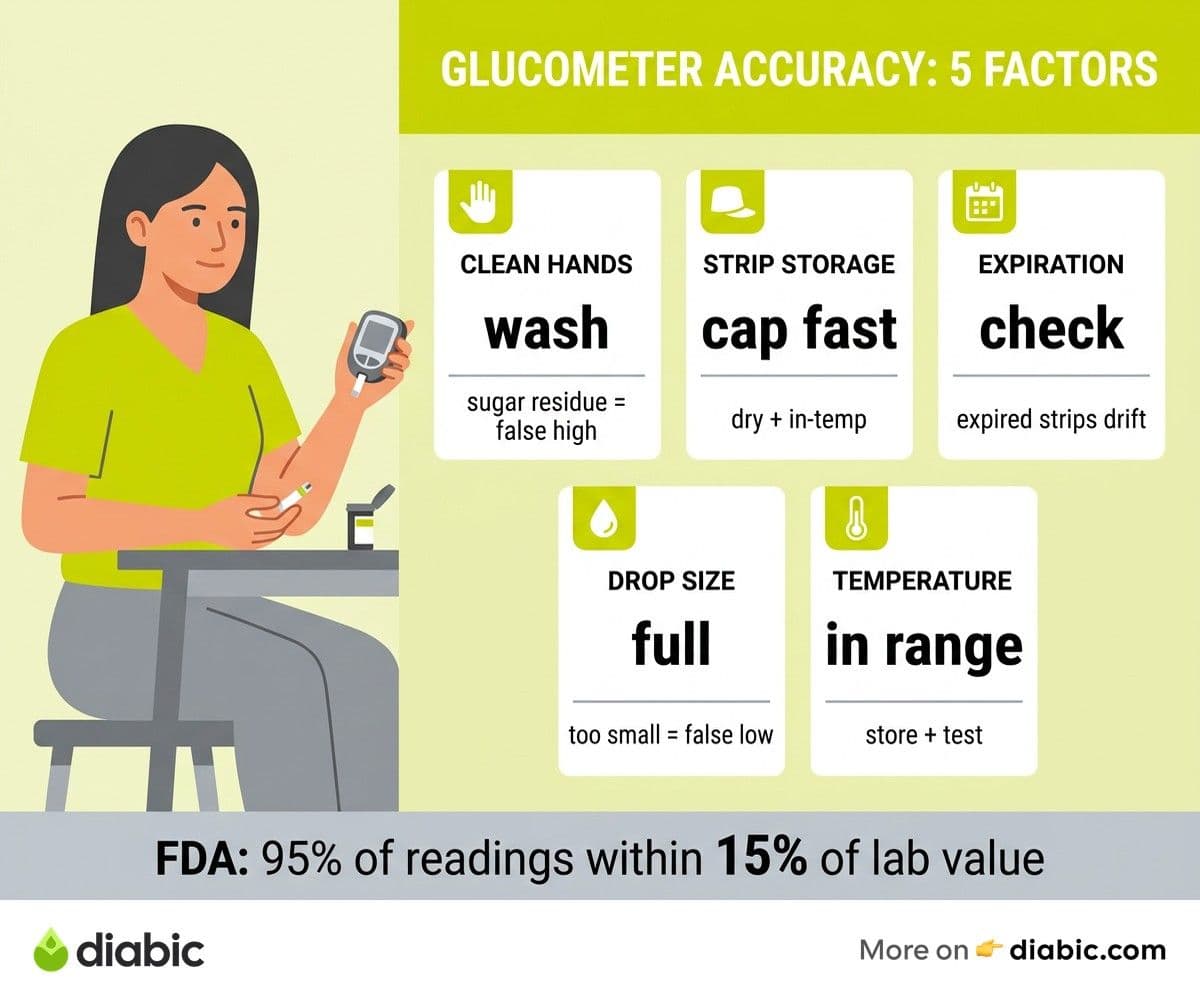
Home blood glucose meters are not lab instruments, and they are not designed to be. The FDA accuracy standard for self-monitoring blood glucose meters requires that 95 percent of readings fall within 15 percent of a reference lab value when blood sugar is 75 mg/dL or higher, and within 15 mg/dL when it is below 75 mg/dL. The remaining 5 percent of readings can fall outside that band and still meet the standard.
The international benchmark is ISO 15197:2013, which sets a similar threshold for accuracy and adds rules around hematocrit interference and altitude tolerance. In plain terms, both standards accept that home meters are useful for daily decisions but not interchangeable with venous lab draws. They are designed to be close enough to act on, not perfect.
This is also why two back-to-back tests from the same fingerstick can show different numbers. A meter reading of 110 followed by 122 does not mean either device is broken. It reflects the normal precision range built into capillary testing and the small differences in blood drop size, strip placement, and sensor response.
Precision versus accuracy
Precision describes how consistent your meter is with itself. Accuracy describes how close it lands to a true reference value. A meter can be precise without being accurate, meaning it gives you the same wrong number repeatedly. It can also be accurate on average but vary widely between tests.
For everyday diabetes management, you want both. The good news is that meeting the FDA and ISO thresholds means most modern meters do reasonably well on both fronts when used correctly. The trouble usually starts with the things you control: strips, technique, and the testing environment. Our guide to A1C normal range explains how lab-based A1C compares to the daily readings your meter produces.
Glucometer Accuracy Factors That Shape Your Readings
Test strip quality is the single biggest variable most people overlook. Strips are reactive chemistry, and they degrade with heat, humidity, and time. A canister left open on a humid bathroom counter can give wrong readings within a week, even if the expiration date is months away. Strips stored in a hot car during summer can be useless by the next test.
Sample size matters more than people expect. Most modern meters need somewhere between 0.3 and 1.0 microliters of blood, and underfilling the strip is a leading cause of false low readings. If your meter beeps an error or you see a number that does not match how you feel, check whether the drop fully covered the test area. A study by Brazg and colleagues in the Journal of Diabetes Science and Technology found that user technique, including sample size, accounted for a meaningful share of accuracy variation in real-world testing.
Hand contamination is another quiet culprit. Glucose residue from fruit, soda, lotion, or even sugary hand sanitizer can sit on your fingertip and skew a reading sharply upward. Researchers have documented cases of false readings hundreds of points high when people tested without washing first. Plain soap and water is enough, and a quick rinse beats an alcohol wipe in most cases.
Environment, hematocrit, and altitude
Most meters are rated to operate between roughly 50 and 104 degrees Fahrenheit. Testing in a cold garage in winter or a hot kitchen near a stove pushes the meter outside that range and can produce unreliable numbers. The strip chemistry is temperature sensitive, and the sensor itself behaves differently at the edges of its operating window.
Hematocrit, the percentage of red blood cells in your blood, also shifts results. People with anemia tend to have falsely high readings, while polycythemia or severe dehydration can produce falsely low ones. Most newer meters are designed to compensate within a wider hematocrit band, but extreme values still affect performance. If you have a known hematological condition, ask your provider whether your meter handles it well.
Altitude plays a smaller role for most people but matters at elevations above roughly 10,000 feet. Some meters lose accuracy in thin air because oxygen levels affect the enzyme reactions on the strip. If you live or travel at high elevation, check the manufacturer's documentation before assuming your numbers are reliable.
User Errors That Skew Glucometer Results
Squeezing the finger too hard to coax out a drop is one of the most common technique errors. Excessive pressure forces interstitial fluid into the sample, which dilutes the blood and lowers the reading. If you have to milk your finger aggressively, the lancet depth is probably set too shallow or the puncture site needs warming first. A warm hand under running water for thirty seconds usually solves this.
Where you test on the finger changes results too. The sides of the fingertip have better blood flow and fewer nerve endings, which means a less painful prick and a fuller drop. The pad, where most people instinctively go, is densely innervated and tends to give smaller, slower samples. If you read our guide on how to use a glucometer, you will see this technique highlighted because it changes both comfort and reliability.
Skipping handwashing is a habit that creeps in when life gets busy, but it deserves attention every single test. Eating an apple, peeling an orange, or applying lotion within an hour of testing can leave residue that throws off your number. The same goes for hand sanitizer with sugar alcohols, which some products contain. A quick wash and dry is the fix.
Coding, calibration, and meter age
Older meters required you to enter a code that matched the strip lot, and forgetting to update it produced consistently wrong results. Most current meters use no-coding technology, but if you are using an older model or one inherited from a family member, check whether coding is required. A meter coded for last year's strips will not give accurate readings on this year's batch.
Meters do not last forever. The internal sensors degrade gradually, and most manufacturers suggest replacing the device every two to three years even if it still appears to work. If your readings have started to drift compared to lab draws or a new meter, the device itself may be near the end of its useful life.
Control solution testing is the simplest way to verify your meter is still in spec. The solution contains a known glucose concentration, and a reading inside the printed range on the strip vial means the meter and strips are working together as designed. Most users skip this entirely, which is a missed opportunity for quick reassurance.
How to Get the Most Accurate Readings at Home
Build a simple pre-test routine and use it every time. Wash your hands with warm water and plain soap, dry thoroughly, and warm your hand if it feels cold. This single habit prevents most contamination errors and improves blood flow at the puncture site, both of which raise the quality of your reading.
Store strips in their original sealed container, away from heat and humidity. The bathroom is the worst place for them despite being the most common storage spot. A drawer in a bedroom or kitchen, away from windows and appliances, works well. Replace the cap promptly after pulling a strip and never transfer strips into pill organizers or unmarked containers.
Check expiration dates the first day of each month. The ADA Standards of Care 2026 recommend that people who self-monitor blood glucose use strips within their labeled date and within the manufacturer's specified window after opening, which is often three to six months. Mark the open date on the canister with a permanent marker so you do not have to guess.
Compare your meter to a lab draw
The most reliable way to know whether your meter is performing well is to compare it directly to a lab measurement. At your next appointment, test on your meter at the same time the lab draws blood. Within 15 percent on either side is normal, and a difference larger than that is worth raising with your care team.
Run a control solution test once a month and after opening a new vial of strips. The whole process takes under a minute and confirms your meter, strips, and technique are working as a system. If the number falls outside the printed range on the canister, replace the strips before testing any further.
A handful of reliable blood glucose meters for home testing consistently rank well in independent accuracy studies. Choosing a meter from a recognized manufacturer like Contour, Accu-Chek, or Prodigy gives you a stronger starting point than picking the cheapest unbranded option you can find online.
When Inaccurate Readings Become Dangerous
Overtreating a low based on a falsely low reading is one of the most preventable mistakes in daily diabetes management. If your meter says 55 but you feel completely fine, retest before swallowing a juice box. A reading that does not match how your body feels deserves a second look, especially when the number falls outside your usual pattern.
Missing a high reading because of a faulty strip or contaminated finger can be just as risky. People who treat insulin doses based on meter results may underdose if the meter reports a falsely low number. If you are seeing post-meal numbers that look unexpectedly tame, especially after a heavy carb meal, retest with a fresh strip and washed hands.
Always confirm before making a major decision. Big insulin corrections, treating a severe-feeling low, or driving when your number is borderline are all moments where a second test is worth the strip. Two readings within 15 percent of each other give you reasonable confidence, while a wide spread tells you something is off with the meter, the strips, or the technique.
Signs your meter needs to be replaced
Persistent disagreement with lab draws by more than 15 percent is the clearest sign. If you have ruled out strip storage, technique, and expiration, the meter itself may be drifting. Run a control solution test to confirm before buying a new device.
Error codes that show up repeatedly, even with fresh strips and a clean meter, point to internal hardware problems. Some manufacturers offer free replacements within the warranty window, so check before throwing the device away. A short call to customer service can save you money.
If you are weighing whether to upgrade, our breakdown of CGM vs glucometer explores when continuous monitoring becomes a better fit. Continuous glucose monitors come with their own accuracy considerations, but they remove many of the user-error variables that affect fingerstick testing.
From my experience: Fourteen years of testing taught me that meter trust is built one habit at a time. Early on, I blamed my meter for wild swings that were really my own technique. Once I started washing hands every single test, replacing strips when I opened a new vial, and comparing to a lab draw twice a year, the numbers stopped surprising me. The meter was almost always doing its job. I just needed to do mine.
FAQ
Why does my glucometer give different readings?
Two readings minutes apart can differ by 10 to 15 percent and still be within the normal precision range for home meters. Common causes for larger differences include inconsistent sample size, hand contamination, strip degradation, or temperature outside the meter's operating range. If the gap is consistently large, run a control solution test and compare the meter to a lab draw.
How accurate are home blood glucose meters?
Home meters that meet FDA standards must be within 15 percent of a lab reference for 95 percent of readings above 75 mg/dL. Most modern devices from established brands clear this bar comfortably when used correctly. Accuracy drops sharply when strips are old, hands are dirty, or testing happens outside the meter's temperature range.
How often should you test your glucometer with control solution?
Once a month is a reasonable baseline, plus any time you open a new vial of strips, drop the meter, or get a reading that does not match how you feel. The control solution comes with most strip kits, and the test takes under a minute. It is the simplest way to rule out the glucometer accuracy factors that creep into daily testing and to confirm your meter and strips are working together as designed.
Shahriar P. Shuvo is the founder of Diabic. He has lived with diabetes for over 14 years, and built Diabic to deliver the practical, evidence-based self-management tools he wished existed when he was first diagnosed. By trade, Shahriar is a senior design and frontend engineer with 6+ years shipping products at Agora, Timescale (now Tiger Data), and ShareTrip. He writes from the intersection of lived diabetes experience and product craft, focused on what works in daily management rather than what sounds good in a textbook.
Medically reviewed by
Dr. Shanto Arian is an internal medicine physician now specializing in clinical and aesthetic dermatology, with a parallel academic focus on epidemiology and public health. He holds an MBBS, MPH, MSc (UK), MRCP (UK), MRCPI (Ireland), Diploma in Dermatology (UK), and Diploma in Aesthetic Medicine (USA). Dr. Arian trained in internal medicine, including hospital work on hematology cases such as graft-versus-host disease, before moving toward dermatology. Skin is one of the earliest places diabetes shows itself, from acanthosis nigricans and diabetic dermopathy to slow foot wound healing, and that intersection is where his clinical and Diabic-review work meet. On Diabic, Dr. Arian medically reviews content on diabetes diagnosis, complications, dermatologic manifestations, and pharmacotherapy, ensuring every claim aligns with current ADA, NICE, and peer-reviewed literature.
More from Devices & Technology
View all
Fasting vs Postprandial Glucose: What's the Difference
Fasting vs postprandial glucose readings tell different stories about your blood sugar. Learn what each number means and how to act on it.

Best Glucometer for Elderly and Low-Vision Users
Best glucometer for elderly and low-vision users: large displays, audio readouts, no-coding strips, and budget picks that make daily testing easier.

Online Diabetes Coaching: How to Choose a Good One
Online diabetes coaching can fill the gaps between doctor visits. Learn what credentials to check, red flags to avoid, and how to pick a quality program.
Clinician-reviewed habits, plain-language guides, and honest answers - the small shifts that make living with diabetes feel lighter, every day.