How to Use a Glucometer Step by Step for Accurate Readings
Learn how to use a glucometer step by step with hand washing, lancing, strip handling, and accuracy tips that prevent misleading blood sugar readings

In this article(16)
Learning how to use a glucometer correctly takes about five minutes, but those five minutes shape whether the number on the screen is one you can trust. A misread of 30 mg/dL can mean the difference between treating a low and treating a high, and a small habit like skipping a hand wash can throw a reading off by that much or more. This step-by-step guide walks through the full process from clean hands to a logged result.
If you were handed a meter at diagnosis and a quick demo at the pharmacy, you are not alone. Most people learn the basics once and never revisit them, which is when small habits drift into accuracy problems.
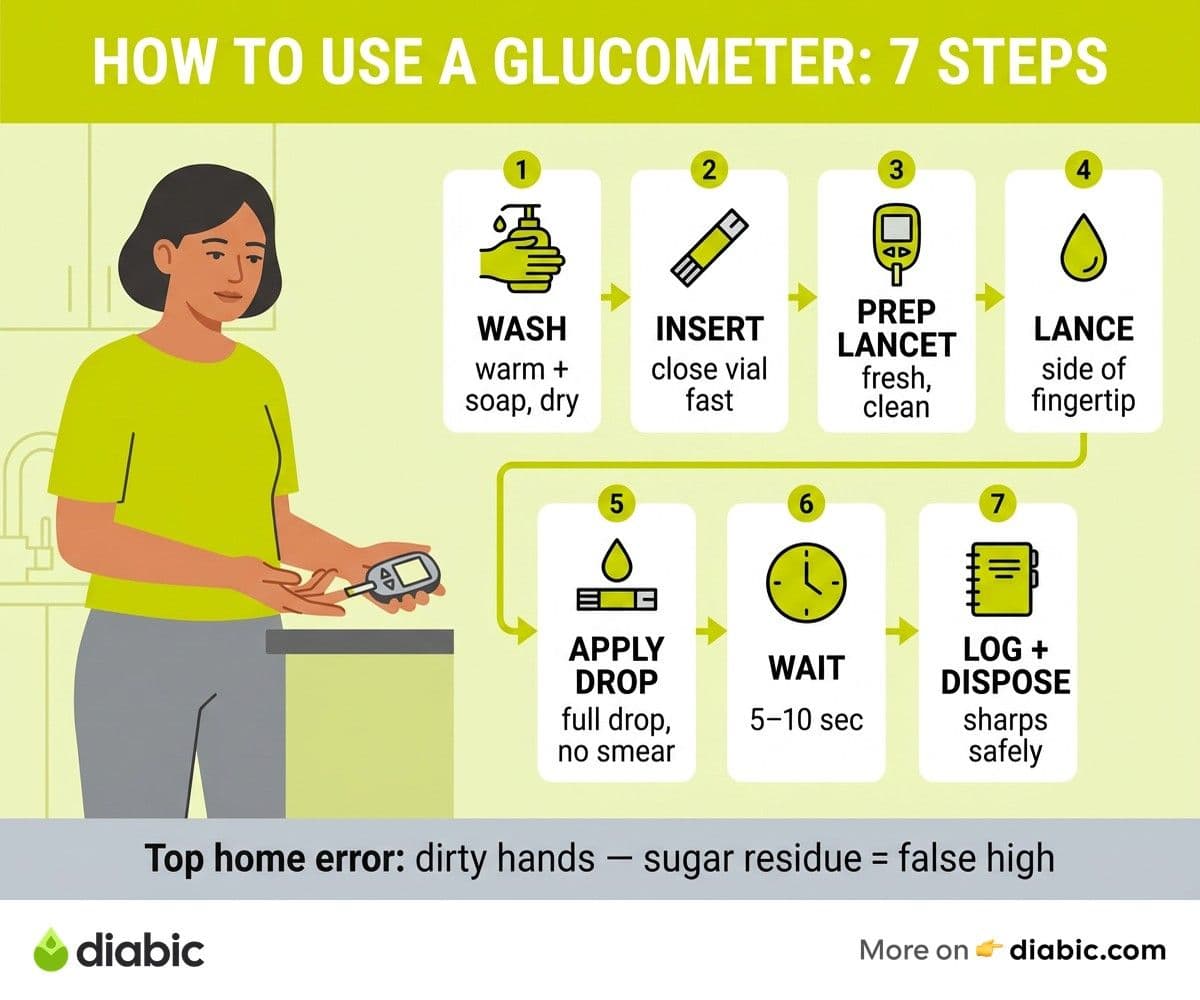
How to Use a Glucometer: Step-by-Step Guide
The process below assumes a standard fingertip blood glucose meter, the kind sold by brands like Contour, Accu-Chek, and OneTouch. The OneTouch user guide and the CDC's diabetes testing basics align on the core steps, with small variations between brands.
Step 1: Wash and Dry Your Hands Thoroughly
Use warm water and soap, and dry completely with a clean towel. Sugar residue from food, lotion, or hand sanitizer is the most common reason home readings come back falsely high. A quick rinse is not enough.
Warm water also helps blood flow to your fingertips, which makes the next steps easier. If you cannot get to a sink, an alcohol wipe is acceptable as a backup, but only if you let it dry fully before lancing because residual alcohol can also distort readings.
Step 2: Insert a Fresh Test Strip Into the Meter
Open the strip vial only when you are ready to test, and close the cap immediately after taking one out. Strips degrade fast when exposed to air and humidity, which is one of the quietest causes of inaccurate readings.
Check the expiration date on the vial before inserting the strip, and confirm that the meter powers on and shows the correct strip code (modern meters auto-code, older models require manual entry). If the meter does not recognize the strip, do not force a second insertion. Pull a fresh strip and try again.
Step 3: Prepare the Lancing Device and Select the Right Depth
Most lancing devices have depth settings from 1 to 5 or 6. Start at the middle setting and adjust based on your skin: thinner skin or smaller hands often need a lower depth, callused or thicker skin may need a higher one.
Use a fresh lancet for each test if possible. Reused lancets dull quickly, which makes the next stick hurt more and increases the risk of an inadequate blood sample.
Step 4: Lance the Side of Your Fingertip
The side of the finger near the nail bed has fewer nerve endings than the pad, which means less pain and equally accurate readings. Rotate fingers across tests to give each site time to heal.
Avoid the thumb and index finger if you can, since you use those most for fine tasks. The middle, ring, and pinky fingers are good rotation candidates.
Step 5: Apply the Blood Drop to the Test Strip
Touch the strip's sample port to the blood drop and let it draw the sample by capillary action. Do not push the strip into your fingertip or smear the drop across the strip, which can produce an underfilled sample and an error.
If the drop is too small, gently milk the finger from the base toward the tip rather than squeezing hard at the puncture site. Squeezing forces interstitial fluid into the sample and dilutes it, producing a falsely low reading.
Step 6: Wait for the Result and Record It
Most modern meters return a result in 5 seconds. Once the number appears, log it in your meter's memory, a paired smartphone app, or a written log. Note the time, whether you were fasting or post-meal, and any context like illness or exercise.
Then dispose of the lancet in a sharps container and the strip in regular trash. Apply pressure to the puncture site with a tissue if it is still bleeding, and you are done.
Choosing the Right Blood Glucose Meter
Not every meter is built the same, and the best one for you depends on your eyesight, dexterity, budget, and how much you want the device to talk to other tools. For a deeper dive into specific models, our best blood glucose meters roundup compares accuracy, app ecosystems, and cost.
For beginners, prioritize a large, backlit display, a simple two-button interface, and a small required sample size (0.5 microliters or less). Meters with these features reduce the chance of a wasted strip or a missed test on a low-energy day.
Strip cost over time is often the bigger expense than the meter itself. Some meters sell at a low price point but require expensive proprietary strips, while others have a higher upfront cost and cheaper strips. Calculate your monthly strip count (testing four times a day is roughly 120 strips per month) and price out both options before committing.
Bluetooth meters that sync to a smartphone app save you from manual logging, which is the part most people abandon. Apps like Contour Diabetes, Accu-Chek mySugr, and OneTouch Reveal pull readings automatically and generate trend reports you can share with your provider.
Healthcare providers often have brand preferences based on what their clinic supports for data downloads. Ask your endocrinologist or diabetes educator which meters integrate with their electronic health record before you buy.
From my experience: I have lived with type 1 diabetes for 14 years and used probably eight different meters across that time. The single biggest accuracy improvement I made was switching from carrying my strip vial loose in my bag (where it cycled through hot cars and humid summers) to keeping it in a small insulated pouch. My pre-meal numbers got noticeably tighter within a week, with no other change. Strip storage matters more than most of us realize.
Common Mistakes That Affect Glucometer Accuracy
The FDA's guidance on home glucose testing lists several common mistakes that explain why home readings sometimes diverge from lab numbers by 10 to 20 percent or more. Most are small habits that are easy to fix once you know about them.
Wet or dirty hands are the top offender. Even a trace of orange juice, banana, or hand cream on your fingertip can pull a reading 50 mg/dL or more above your real glucose. Always wash and dry, especially around food prep.
Expired or mishandled test strips are the second culprit. Strips have an expiration date on the vial and a separate "use within X months of opening" window. Heat above 86 degrees Fahrenheit, freezing temperatures, and humidity above the strip's tolerance all degrade the chemistry.
Squeezing the finger too hard dilutes the blood with interstitial fluid and produces a falsely low result. Use a slightly higher lancing depth and let the drop form naturally rather than forcing it.
Hand sanitizer residue is sneaky because the alcohol smell evaporates faster than the sugar in some formulations. Wash with soap and water rather than relying on sanitizer, and never test immediately after applying lotion.
Altitude, temperature, and humidity all affect both the strip chemistry and the meter's electronic calibration. Most meters operate accurately between 50 and 104 degrees Fahrenheit. Outside that range (a cold winter morning testing in the car, a hot summer afternoon at the beach), wait until you and the meter are at room temperature before testing. For a deeper look at every variable that can shift your number, see our breakdown of glucometer accuracy factors.
When and How Often to Test Your Blood Sugar
The ADA Standards of Care 2026 recommend testing frequency based on your treatment plan, not a one-size-fits-all schedule. People on multiple daily insulin injections typically test 4 to 10 times a day, while those on oral medications might test once or twice depending on stability.
Common testing windows include first thing in the morning before eating (fasting), right before each meal, two hours after meals to check post-meal response, before and after exercise, and at bedtime. Each window answers a different question about your management.
Add extra checks when you are sick, stressed, or starting a new medication. Illness alone can spike glucose well above your usual range, and a few extra finger sticks during a cold can prevent a much bigger issue.
Pregnancy testing schedules are stricter, and gestational diabetes management often calls for fasting plus three post-meal checks daily. Your obstetrician or endocrinologist will outline the specific routine, which usually intensifies as the pregnancy progresses.
Recording and Using Your Results
Logging matters because individual numbers tell you very little about your overall management. Patterns across a week or month are what reveal what is actually working and what needs adjustment.
A paper logbook still works, especially for people who like a tactile reference. The downside is that paper logs are easy to skip on busy days, and they do not show trends visually. App-based logs make pattern recognition far easier and let you tag context like meals, exercise, or stress.
Bluetooth meters paired with a smartphone app give you the cleanest workflow because there is no manual entry. If you also wear a CGM, our how to use your CGM app guide covers how to layer those data sets together.
Bring two to four weeks of logs to your next provider appointment, ideally exported as a PDF or shared through your meter's app. The conversation goes faster and the recommendations are sharper when there is real data to look at rather than relying on your memory of the last few weeks.
Your home readings also connect to your A1C, which is a three-month average of your blood glucose. If your home log average runs around 154 mg/dL, your A1C is likely close to 7.0 percent. Significant gaps between your home log average and your lab A1C are worth flagging, because they can mean the meter needs control-solution testing or that your testing windows are missing key periods. Our explainer on the A1C normal range covers how to read those numbers in context.
Building a Reliable Testing Routine
Now that you know how to use a glucometer step by step, the goal is to make the process habitual enough that you do it correctly even on autopilot. Choose a consistent location at home, keep your supplies together, and pick anchor moments (waking up, meal start, bedtime) to test rather than trying to remember random times.
The five minutes you put into clean technique pay back as readings you can actually act on. Talk to your doctor or diabetes educator about your testing schedule and bring a logbook to your next visit. Small adjustments to timing or technique often move A1C numbers more than people expect.
FAQ
How do you use a glucometer step by step?
Wash and dry your hands, insert a fresh test strip, set the lancing device depth, lance the side of your fingertip, apply the blood drop to the strip's sample port, and read the result after about 5 seconds. Log the number with the time and any relevant context like meal timing or exercise.
How do you get accurate readings from a glucometer?
Wash with soap and water before every test, store strips in their sealed vial away from heat and humidity, check expiration dates, avoid squeezing the finger to force a drop, and let the meter and strips reach room temperature before testing. These habits address the most common sources of misleading results.
How often should you replace your glucometer?
Most meters last 3 to 5 years with normal use, though you should replace yours sooner if it shows error codes frequently, drifts noticeably from your lab A1C, or stops syncing with your app. Run a control-solution test every few months to confirm accuracy, especially after a drop or temperature exposure.
Once you have practiced how to use a glucometer the same way each time, the technique starts to fade into background habit, and that is exactly the goal. Trustworthy numbers come from clean hands, dry strips, and consistent timing far more than from any specific brand of meter. Bring your logs to every visit, ask your provider to compare your home average with your lab A1C, and adjust the parts of your routine that need it. The meter is a tool. The skill is what turns it into useful information.
Shahriar P. Shuvo is the founder of Diabic. He has lived with diabetes for over 14 years, and built Diabic to deliver the practical, evidence-based self-management tools he wished existed when he was first diagnosed. By trade, Shahriar is a senior design and frontend engineer with 6+ years shipping products at Agora, Timescale (now Tiger Data), and ShareTrip. He writes from the intersection of lived diabetes experience and product craft, focused on what works in daily management rather than what sounds good in a textbook.
Medically reviewed by
Dr. Rezwana Parvin Rumpa is an obstetrics and gynaecology specialist with clinical focus on gestational diabetes, PCOS, and fertility. She holds the MRCOG (Final Part) from the Royal College of Obstetricians and Gynaecologists in London, the MRCPI (Final Part) from the Royal College of Physicians of Ireland, and an MBBS from Shaheed Monsur Ali Medical College under Dhaka University. Dr. Rumpa serves as a Senior Medical Officer in the Obs and Gynae department at BRB Hospitals Ltd, where she has spent three years managing prenatal care, emergency obstetric cases, and women's-health surgery. On Diabic, she medically reviews content for women living with diabetes, with particular attention to pregnancy, PCOS, and reproductive-health intersections.
More from Devices & Technology
View all
Fasting vs Postprandial Glucose: What's the Difference
Fasting vs postprandial glucose readings tell different stories about your blood sugar. Learn what each number means and how to act on it.

Best Glucometer for Elderly and Low-Vision Users
Best glucometer for elderly and low-vision users: large displays, audio readouts, no-coding strips, and budget picks that make daily testing easier.

Online Diabetes Coaching: How to Choose a Good One
Online diabetes coaching can fill the gaps between doctor visits. Learn what credentials to check, red flags to avoid, and how to pick a quality program.
Clinician-reviewed habits, plain-language guides, and honest answers - the small shifts that make living with diabetes feel lighter, every day.