Hiking Hacks for Diabetes: Gear and Safety Tips
Hiking hacks for diabetes: trail-tested gear, blood sugar management, snack ideas, and safety planning so outdoor adventures stay fun and safe.

In this article(7)
Hiking with diabetes takes more preparation than tossing a water bottle in your backpack, but it does not have to keep you off the trail. With the right gear, snacks, and a plan for blood sugar management, outdoor adventures are absolutely within reach. The best hiking hacks diabetes hikers actually rely on are not gimmicks; they are small habits that turn an unpredictable day into a manageable one.
A trail is not a hospital, a parking lot, or a gym, which is exactly why it requires its own playbook. Temperature swings, altitude, exertion, and time pressure all push blood sugar in different directions. Knowing how to plan for those forces makes the difference between a confident outing and a worrying scramble at mile six.
This guide covers the gear we actually keep in our packs, how we manage blood sugar across the day, what we eat on the trail, and how we plan for the times when something goes wrong. Whether you live with type 1, type 2, or are caring for a kid with diabetes, the same principles apply.
Hiking Hacks Diabetes Hikers Pack: Essential Gear
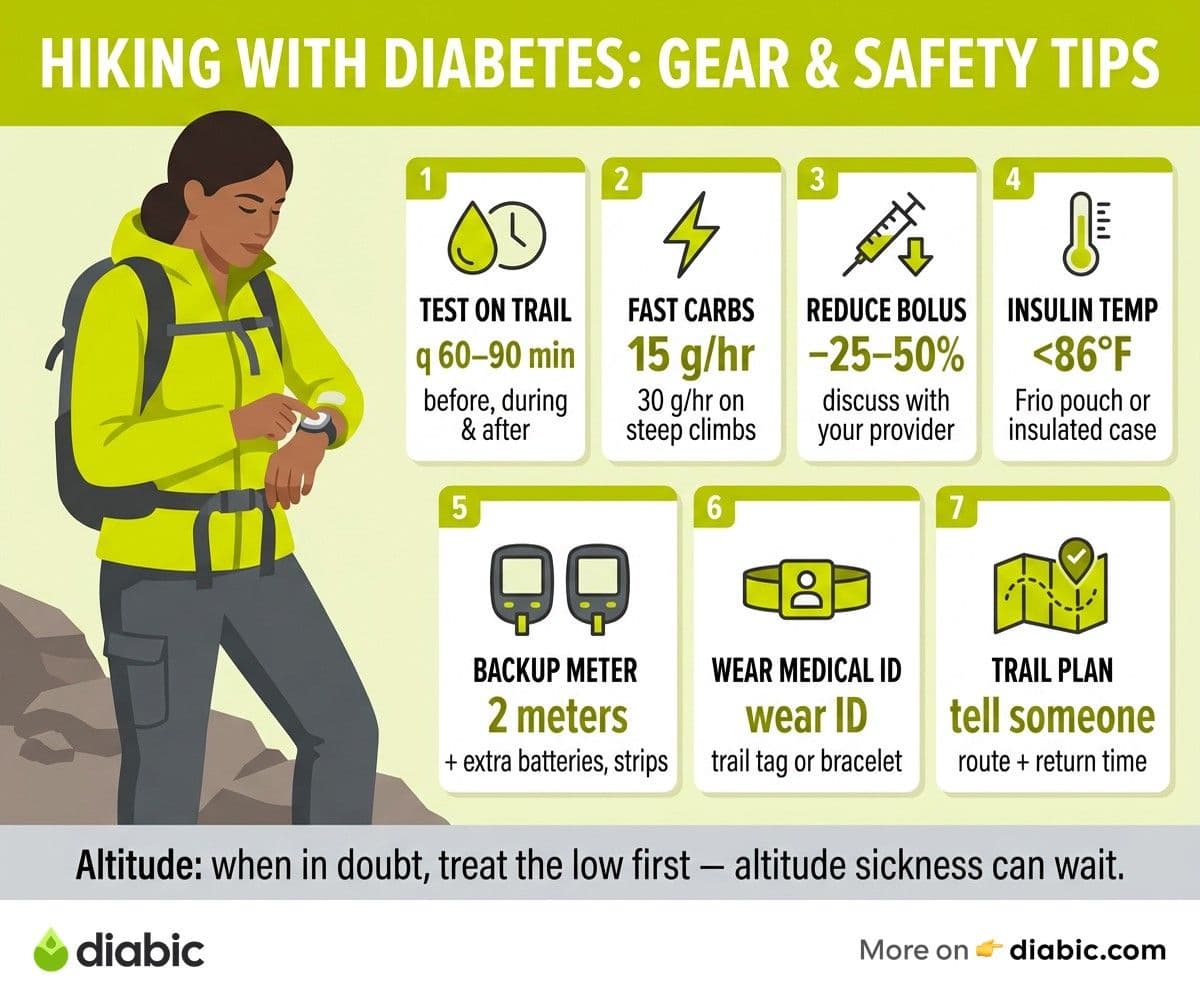
The base layer of any hiking kit is climate protection for your medications and devices. Insulin starts to break down above 86 degrees Fahrenheit and below freezing, and test strips lose accuracy fast in heat or humidity. The American Diabetes Association lists temperature stability as a top reason insulin loses potency before its labeled expiration date.
An insulated pouch with a frozen gel pack is the cheapest fix. We carry insulin in a Frio-style pouch that activates with cold water, plus a hard-shell case for vials and pens that prevents cracking under a heavy pack. For day hikes that climb above 8,000 feet, we add an extra layer of insulation because thin air can leave gear exposed to direct sun temperatures well above the air temperature. Our insulin storage tips post goes deeper into the temperature math if you want a rigorous setup.
A medical ID is the second non-negotiable. A bracelet, necklace, or shoe tag with "Type 1 Diabetes" or "Type 2 Diabetes - Insulin Dependent" gives a stranger or first responder the information they need if you cannot speak for yourself. Tuck a paper card with your endocrinologist's number, current medications, and your emergency contact in your pack as backup.
A portable sharps container is small, light, and respects the trail. Used lancets, syringes, and infusion sets do not belong loose in a side pocket where they can stab you, your dog, or another hiker. A travel sharps tube in a side pouch handles a multi-day trip without bulk.
Backup electronics matter more than people realize. Cold drains glucose meter batteries, and humidity can fog up screens. We carry a backup meter in a different pocket from our primary, plus extra batteries and a sealed strip vial. A power bank for your phone keeps your CGM app and trail map alive on days when you forget to charge overnight.
Blood Sugar Management on the Trail
Hiking is one of the most insulin-sensitive activities you can do because it combines sustained moderate effort with elevation, weight bearing, and time. That sensitivity is wonderful for long-term glucose averages and stressful in the moment, because what worked on Tuesday's flat trail may push you low on Saturday's climb.
The base habit is testing more often than you think you need to. Check before you start, every 60 to 90 minutes on the trail, and again at the end. CGM users still benefit from a fingerstick check before key decisions because trend arrows can lag behind real-time exertion changes. The Wilderness Medical Society recommends extra testing in altitude or cold environments where readings can drift.
Fast-acting carbs go everywhere you go. Plan for at least 15 grams of fast carbs per hour of moderate hiking, and double that for steep elevation gain or hot days. Glucose tabs are reliable but boring. Juice boxes weigh more but taste better and rehydrate at the same time. Gummies and gels work, though some brands hit slower than they look on the label.
If you use mealtime insulin, talk to your doctor about reducing the bolus before a hike. Many endocrinologists suggest cutting the pre-hike meal bolus by 25 to 50 percent for a moderate outing, and more for sustained effort. Pump users can run a temporary basal reduction for the duration of the hike plus a few hours afterward, since exercise-induced insulin sensitivity often lingers into the evening.
Altitude adds another layer. Hypoglycemia symptoms (shakiness, confusion, irritability) can mimic altitude sickness, and the two can also overlap. The CDC's guidance on physical activity with chronic conditions recommends planning rest stops at altitude and not pushing through symptoms you cannot explain. When in doubt, treat the low first; altitude sickness can wait while glucose tabs do their job.
Best Trail Snacks for Steady Energy
The right snack mix prevents two failure modes: the slow grind into a low halfway through the hike, and the sugar spike that leaves you crashing on the descent. We aim for snacks that combine slow-release carbs, protein, and fat so the glucose curve stays gentle rather than shaped like a roller coaster.
Trail mix is the classic for a reason. Almonds, walnuts, pumpkin seeds, and a small handful of dried cranberries or apricots give you slow energy without a steep rise. Skip the chocolate-heavy mixes that read more like dessert than fuel; they tend to melt, spike fast, and crash hard. Our 8 foods that won't spike blood sugar post has more options if you want to build your own mix.
Cheese and whole-grain crackers travel surprisingly well in cool weather and deliver a balanced protein-carb hit that lasts a few hours. Hard cheeses like cheddar or gouda hold up to a few hours in a pack, and crackers stay intact in a small hard-sided container. Peanut butter or almond butter packets stash easily, deliver fat and protein for slow energy, and pair well with apple slices.
Avoid the high-sugar energy bars that line the front shelf at every gear shop. Many of them are essentially candy with a granola coating. They spike fast, drop hard, and leave you reaching for more sugar an hour later. Save them for emergencies, not daily fuel.
For longer hikes, consider a small lunch rather than constant grazing. A wrap with turkey, hummus, and spinach rolled tight in foil sits in a pack for hours and gives a real meal at the halfway point. The same logic applies on multi-day treks; planning solid meals at predictable intervals beats trying to graze your way through 12 hours of effort. If road tripping to your trailhead, our road trip meal planning guide can help you stay steady before you ever hit the dirt.
Safety Planning for Remote Hikes
Solo trail time is a real pleasure, but it raises the bar on planning. The first habit is leaving a clear plan with someone who is not on the hike. Tell them your route, expected return time, and your diabetes status, including what to tell rescuers if you go missing. A text message with a screenshot of the trail map and a check-in time is enough for most short outings; longer expeditions deserve a written itinerary.
From my experience: the day I value-engineered my hiking kit hardest was the day I got it most wrong. I left my backup meter in the car for "just a quick three-miler" and dropped my primary meter into a creek crossing 90 minutes in. I rationed glucose tabs by feel for the next three hours. Since then, I treat the backup meter and my emergency carbs the same way I treat car keys; if I cannot put my hand on them, I am not leaving the trailhead.
Your phone is a safety tool, not a guarantee. Carry a fully charged phone, but assume the battery will die or signal will drop. A paper map of the trail, a compass, and a quick refresher on how to read both are more useful than they sound until the moment you need them. Rangers in most US national parks still recommend paper backups even in heavily traveled areas.
Among the hiking hacks diabetes veterans repeat most often, this one is hard to overstate: a hiking partner who recognizes hypoglycemia is a force multiplier. Show them what your symptoms typically look like, where your glucagon is in your pack, and how to dial 911 with your location. The conversation takes five minutes and could save a life. If you hike with kids who have diabetes, our sports and diabetes for kids guide covers the safety briefing in more depth.
Research your trail before you go. Elevation gain, total distance, water sources, and cell coverage all factor into how much insulin to bring, how much food to pack, and how aggressive to be with basal reductions. The American Hiking Society publishes a strong primer on trail safety planning that pairs well with diabetes-specific prep.
Frequently Asked Questions
How do I manage blood sugar while hiking?
Test before you start, every 60 to 90 minutes on the trail, and at the end. Pack at least 15 grams of fast-acting carbs per hour of moderate effort and double it for steep climbs or hot days. Talk to your doctor about reducing pre-hike insulin doses, and consider a temporary basal reduction if you use a pump. Carry glucagon, a backup meter, and a clearly visible medical ID, and check in with a partner before you head out.
What are the best snacks for hiking with diabetes?
Look for snacks that combine slow-release carbs with protein and fat so glucose stays steady. Trail mix with nuts and a small amount of dried fruit, cheese with whole-grain crackers, nut butter packets, and small wraps work well for sustained energy. Keep glucose tabs or juice boxes separate as fast-acting backup, and avoid high-sugar energy bars that spike and crash.
A useful next step is to walk through your day pack today, line by line, and write down what is missing. The hiking hacks diabetes hikers swear by are only as useful as the gear you actually pack, and a 10-minute audit before your next hike beats a 10-mile scramble in the field.
Shahriar P. Shuvo is the founder of Diabic. He has lived with diabetes for over 14 years, and built Diabic to deliver the practical, evidence-based self-management tools he wished existed when he was first diagnosed. By trade, Shahriar is a senior design and frontend engineer with 6+ years shipping products at Agora, Timescale (now Tiger Data), and ShareTrip. He writes from the intersection of lived diabetes experience and product craft, focused on what works in daily management rather than what sounds good in a textbook.
Medically reviewed by
Dr. Rezwana Parvin Rumpa is an obstetrics and gynaecology specialist with clinical focus on gestational diabetes, PCOS, and fertility. She holds the MRCOG (Final Part) from the Royal College of Obstetricians and Gynaecologists in London, the MRCPI (Final Part) from the Royal College of Physicians of Ireland, and an MBBS from Shaheed Monsur Ali Medical College under Dhaka University. Dr. Rumpa serves as a Senior Medical Officer in the Obs and Gynae department at BRB Hospitals Ltd, where she has spent three years managing prenatal care, emergency obstetric cases, and women's-health surgery. On Diabic, she medically reviews content for women living with diabetes, with particular attention to pregnancy, PCOS, and reproductive-health intersections.
More from Living with Diabetes
View all
A Gentle Chair Yoga Routine for people with diabetes
A gentle chair yoga for people with diabetes routine with safe poses, modifications for neuropathy, retinopathy, and joint pain, plus tips for older.

Shift Work and Diabetes: Managing Irregular Hours
Shift work and diabetes is a tough combination. Learn how to manage meals, sleep, medication, and blood sugar when your hours rotate or flip overnight.

Dating with Diabetes: When to Tell a New Partner
Dating with diabetes brings unique disclosure questions. Here is when to tell a new partner, what to say, and how to handle the conversation with.
Clinician-reviewed habits, plain-language guides, and honest answers - the small shifts that make living with diabetes feel lighter, every day.